In SaaS editions of Qlik Sense, you can add users by sending invite emails. Once the invited user accepts the invite, you can assign roles to that user in the management console. However, as a tenant admin you do not get a notification when someone accepts your invite and you have to manually check the Users tab in the management console to see whether their status has changed from Pending to Active. Luckily, there is an easy way to automate that. Let’s do this!
Step 1 – API key
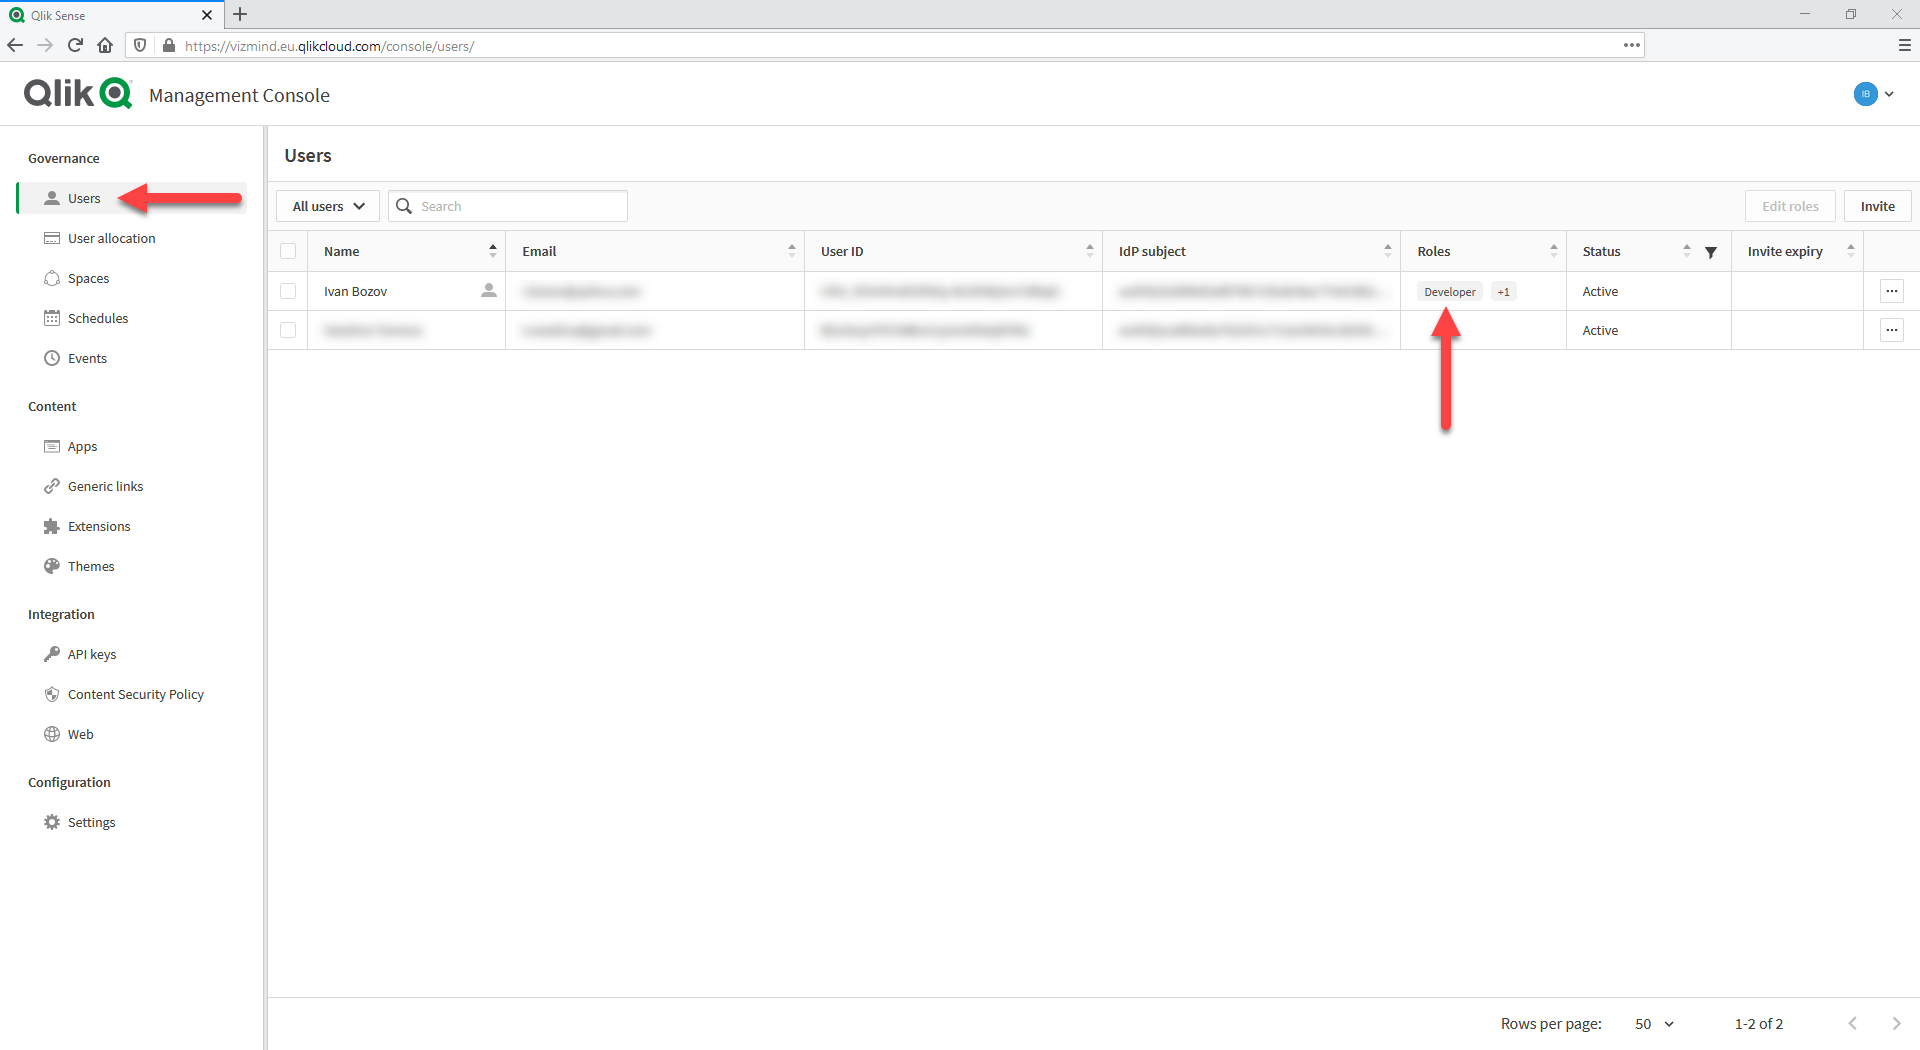
As a start, we need an API key. Go to Management console > Governance > Users and make sure that you have a Developer role.
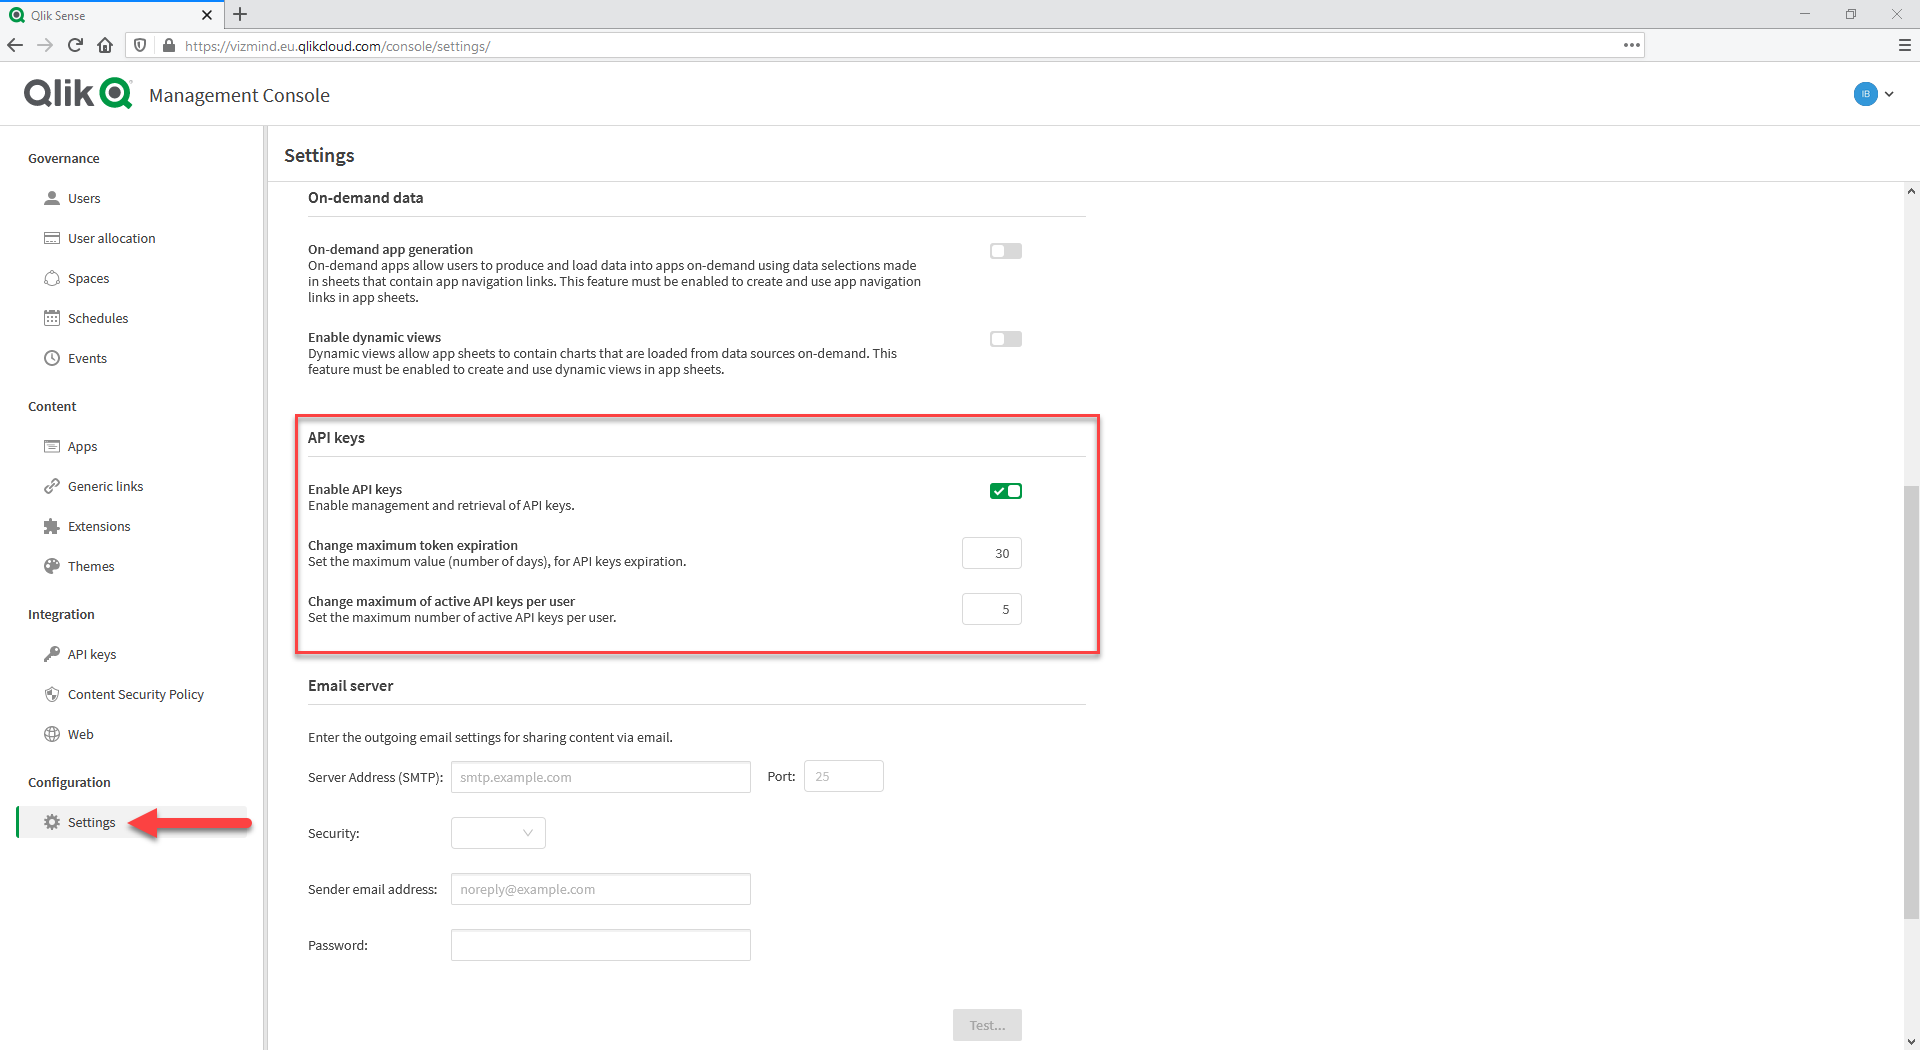
Once you have done that, head over to Management console > Configuration > Settings > API keys and toggle the switch. In addition, you can also set the token expiration time and the maximum active API keys per user.
Next, it is time to create the actual API key. Go to Profile settings > Management > API keys and click on Generate new key. Write a short description and select the expiration time. The maximum expiration time will be the value set in the management console. When both fields are filled in, hit the Generate button.
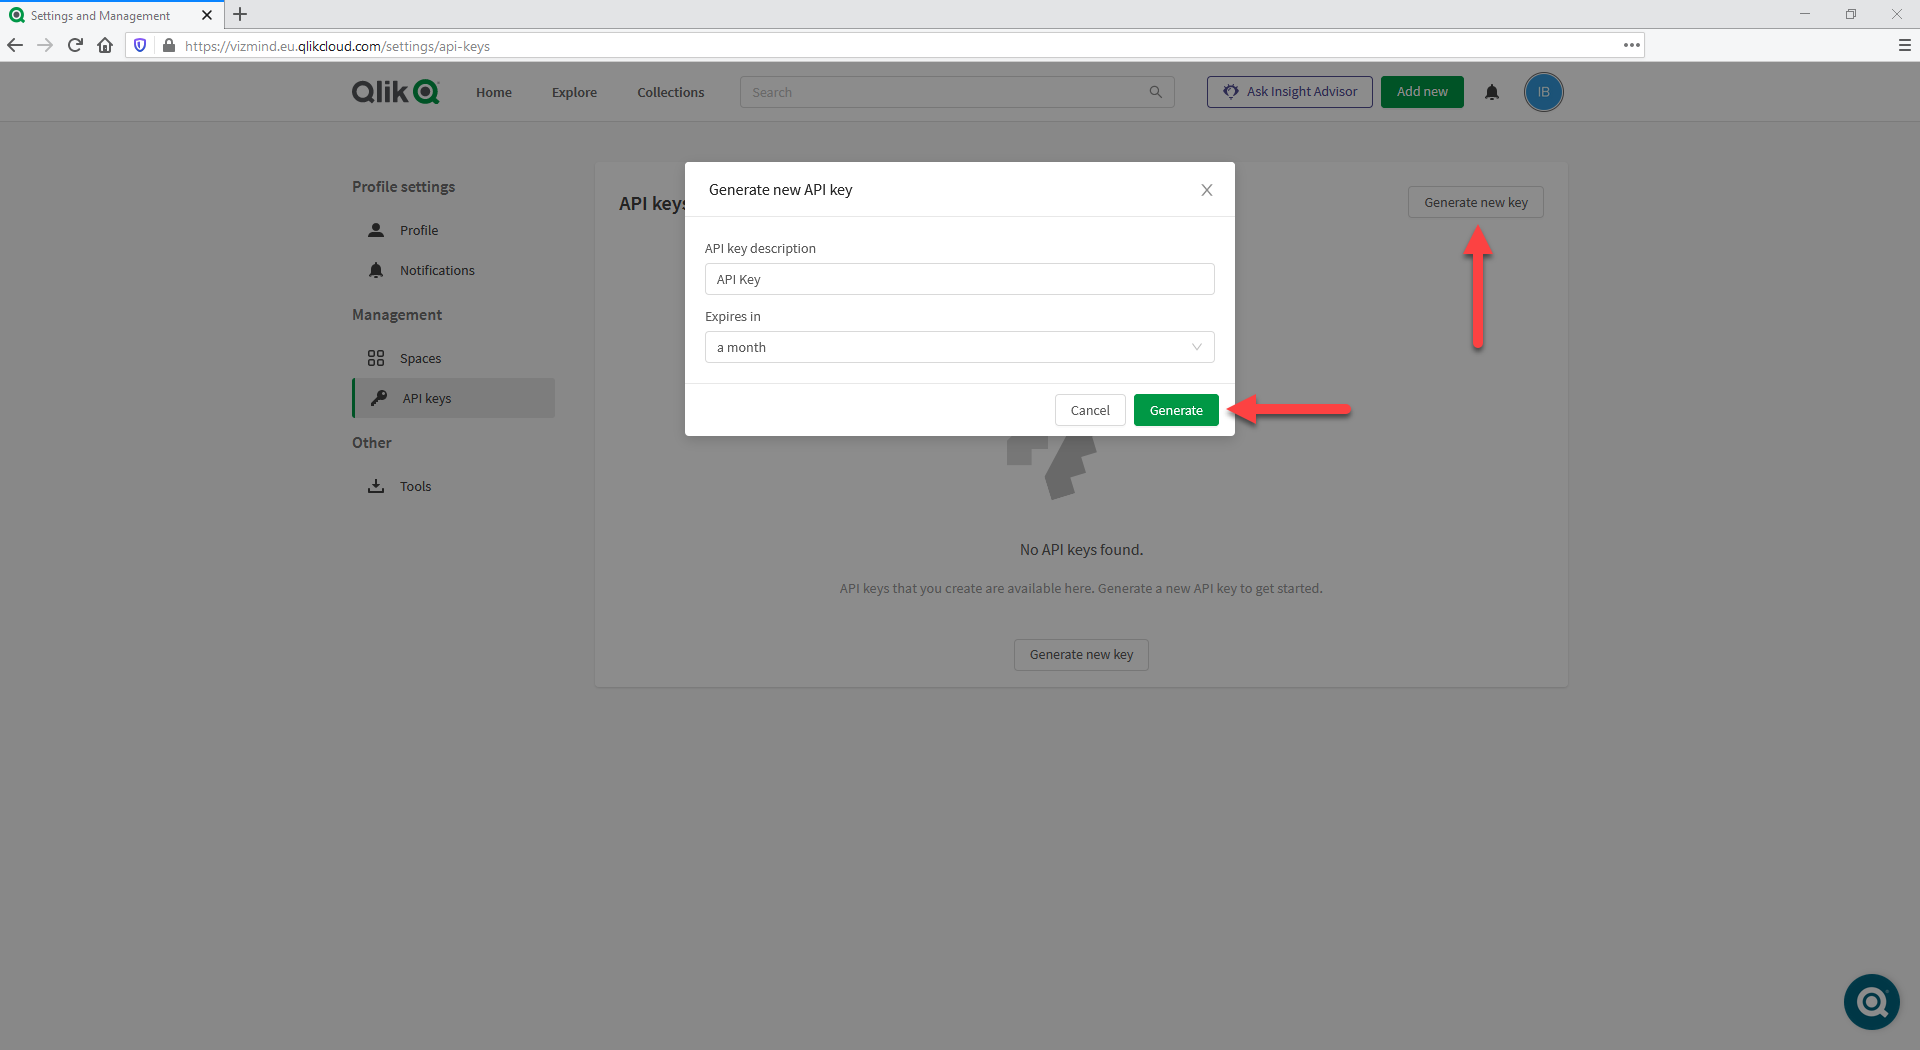
The system will generate a long API key and display it on the screen.
Step 2 – Data connection
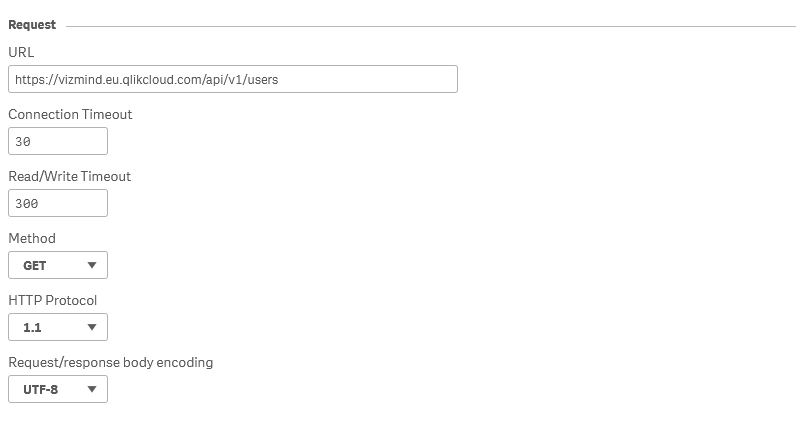
Now create a new app in one of your spaces (the space used in this example is called Alerts) and open the script editor. Click on Create new connection and select REST. In the Request section paste the following URL:
https://tenant.region.qlikcloud.com/api/v1/users
Tenant and region refer to your tenant name and location. Change them accordingly. Here an example with the VizMind tenant which is hosted in Europe.
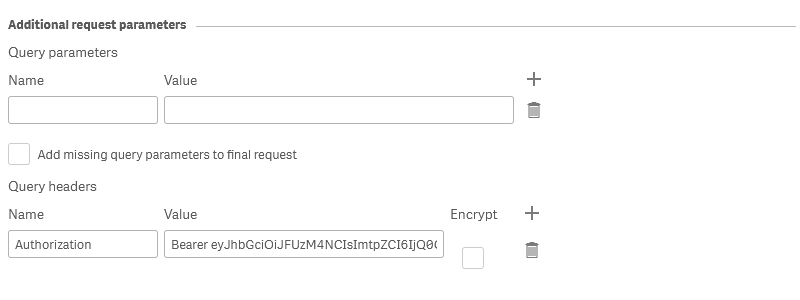
Next, scroll down to the section Additional request parameters. It is time to use the API key generated in Step 1. In Query headers apply the following settings:
Name:  Authorization
Value: Bearer API key
Your input should look like this:
By default these settings will return 20 data records. You can increase this number to maximum 100 by adjusting the URL as follows:
https://tenant.region.qlikcloud.com/api/v1/users?limit=100
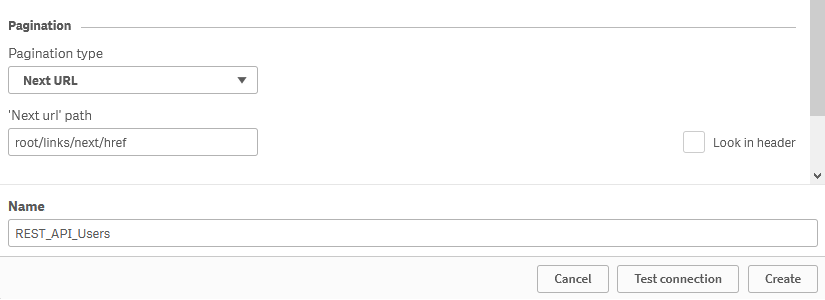
However, if there are more than 100 data records (in this example this would mean more than 100 users in the tenant), it would be best to scroll down to the Pagination section and apply the following settings:
Pagination type: Next URL
'Next url' path: root/links/next/href
Finally, name the connection, click the Test connection button to ensure that it works and click on Create to save it.
Step 3 – Data model
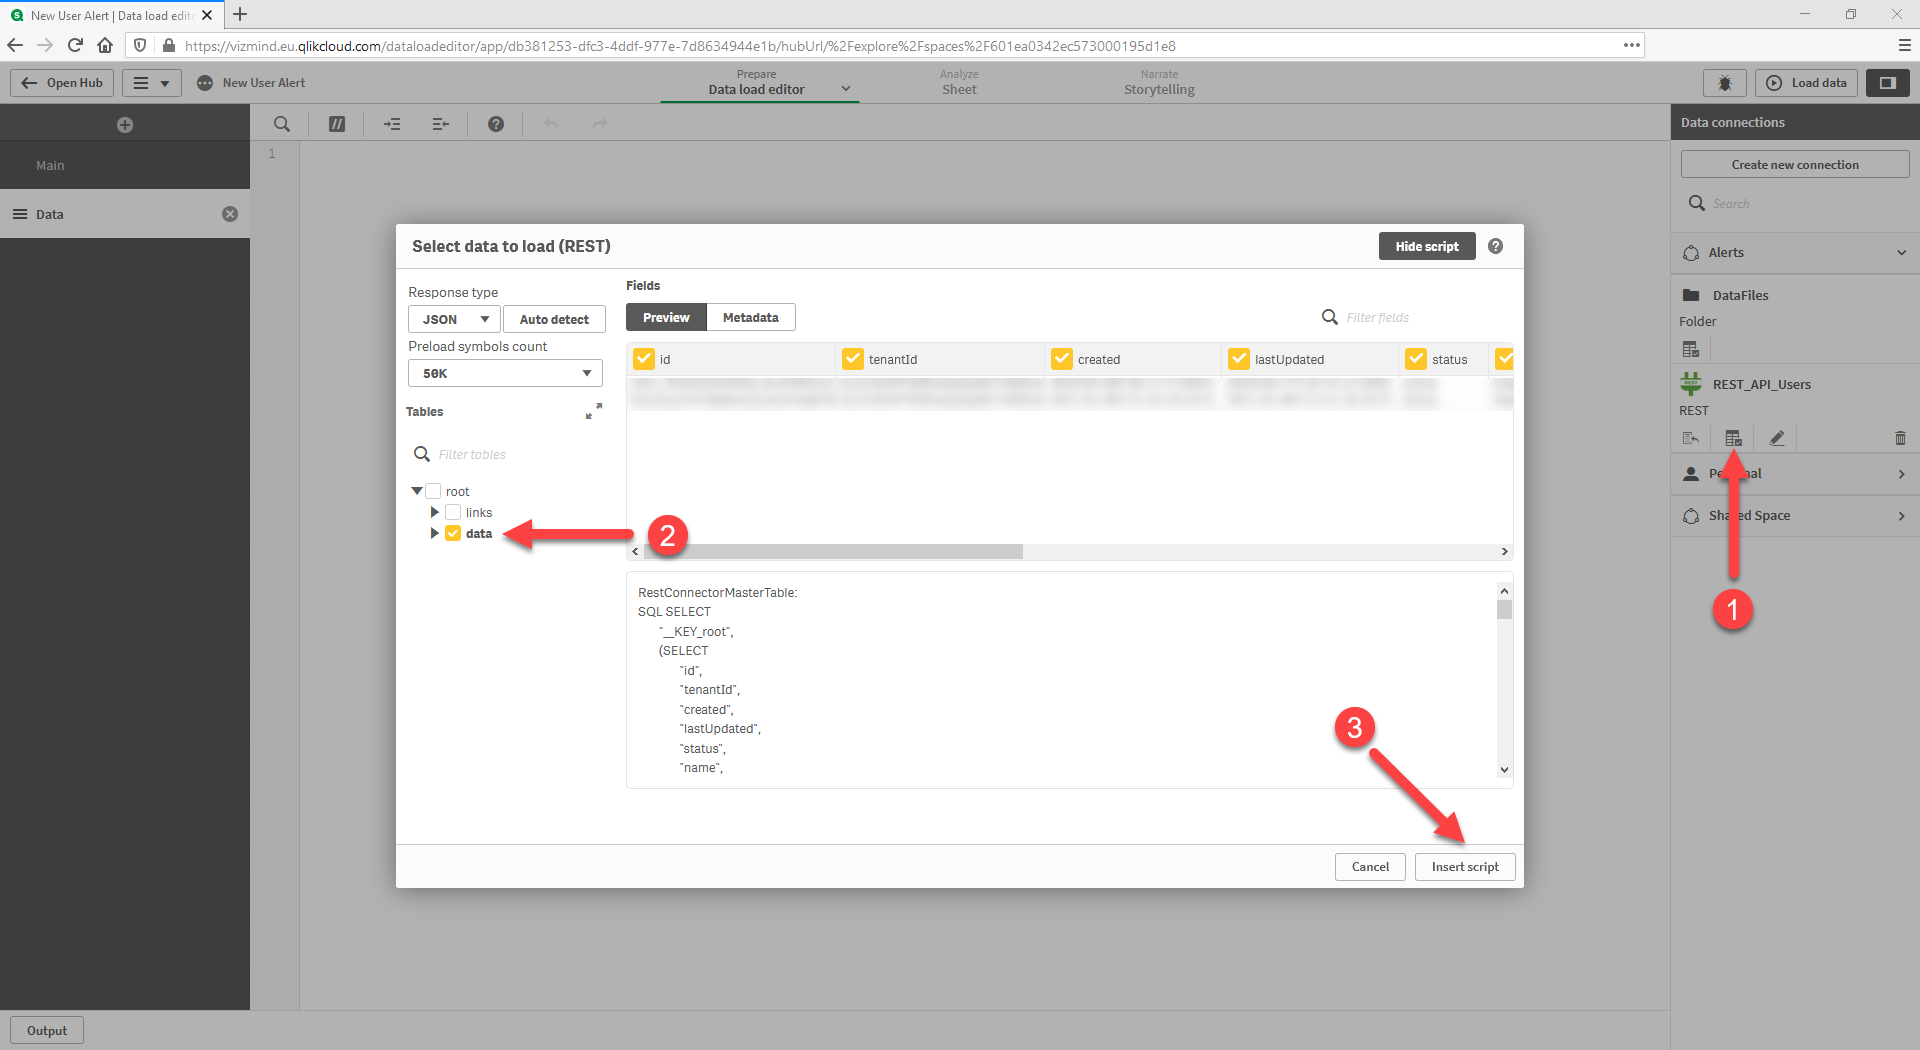
Now that we have the data connection, the next step is to create a simple data model. Open a new section, e.g. Data, in the data load editor and find the REST connection that we just saved. It will be in the Data connections panel, in the space where your app is. In this example, the space is called Alerts and the connection REST_API_Users. Click the Select data button below the connection, select the table data and click on Insert script.
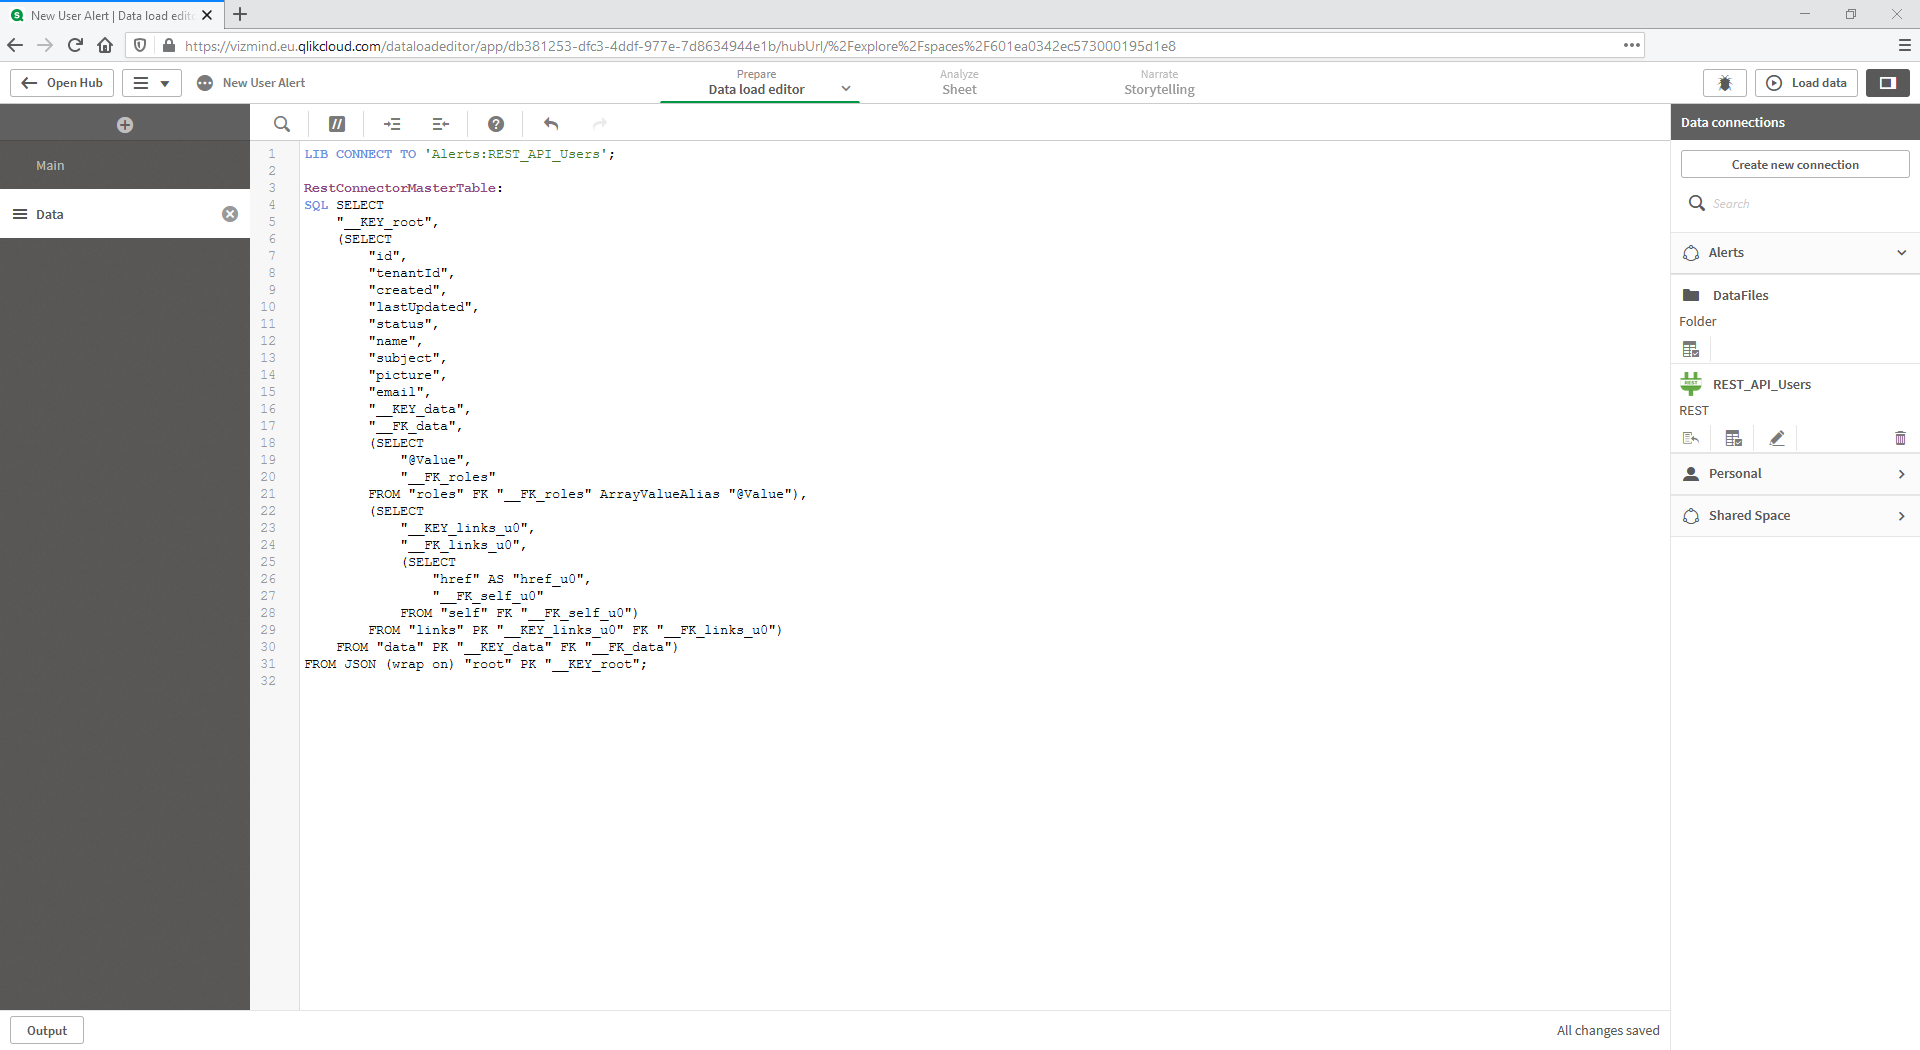
You will get an automatically generated script. Leave the CONNECT statement and the table RestConnectorMasterTable and delete the rest:
Next, we will load all users and store the data as a QVD file. Add the following lines and click the Load data button.
Users:
LOAD
    [id] AS User_ID,
    [name] AS User_Name
RESIDENT RestConnectorMasterTable
WHERE NOT ISNULL([__FK_data]);

Users_Stored:
NOCONCATENATE LOAD
    User_ID AS User_ID_Stored
RESIDENT Users;

STORE Users_Stored INTO [lib://Alerts:DataFiles/Users.qvd](qvd);

DROP TABLES RestConnectorMasterTable, Users, Users_Stored;
The script above first loads all users IDs and user names in the table Users. Then the table Users_Stored saves their IDs and the STORE statement creates a QVD file in the DataFiles folder of the space. Note that the path to the file includes the name of the space. The last line of code drops all tables so in the end we have one QVD file and no data in our app.
Now we want to compare the data in the QVD file with the data that will be generated during the next reload as it might contain new users that have joined the tenant. To do this, add the below lines colored in green between the Users and Users_Stored tables. The final script should look like this:
Users:
LOAD
    [id] AS User_ID,
    [name] AS User_Name
RESIDENT RestConnectorMasterTable
WHERE NOT ISNULL([__FK_data]);

Existing_Users:
LOAD
    User_ID_Stored
FROM [lib://Alerts:DataFiles/Users.qvd](qvd);

New_Users:
LOAD
    User_ID AS New_User_ID,
    User_Name AS New_User_Name
RESIDENT Users WHERE NOT EXISTS (User_ID_Stored, User_ID);

DROP TABLE Existing_Users;

Users_Stored:
NOCONCATENATE LOAD
    User_ID AS User_ID_Stored
RESIDENT Users;

STORE Users_Stored INTO [lib://Alerts:DataFiles/Users.qvd](qvd);

DROP TABLES RestConnectorMasterTable, Users, Users_Stored;
As before, the script first loads all users IDs and user names in the table Users. Then the table Existing_Users loads the data from the QVD file. Next, the table New_Users compares the entries in Users and Existing_Users and loads only the users whose IDs cannot be found in the Existing_Users table, i.e. only the new users that have joined the tenant since the last reload of the app. The last table again stores the full list of user IDs. The STORE statement then updates the QVD file and makes it ready for the next reload. The data model now has one table that includes the IDs and names of the new users. Let’s visualize this information.
Step 4 – Front end
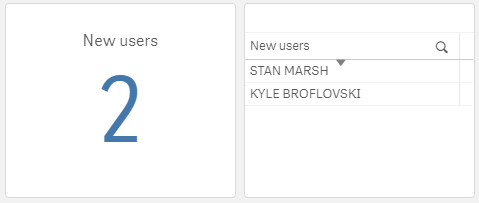
As we have only one table with two fields, the front end will be pretty simple – KPI object with one measure and straight table with a one dimension.
KPI:   COUNT(New_User_ID)
Table: New_User_Name
Step 5 – Alert
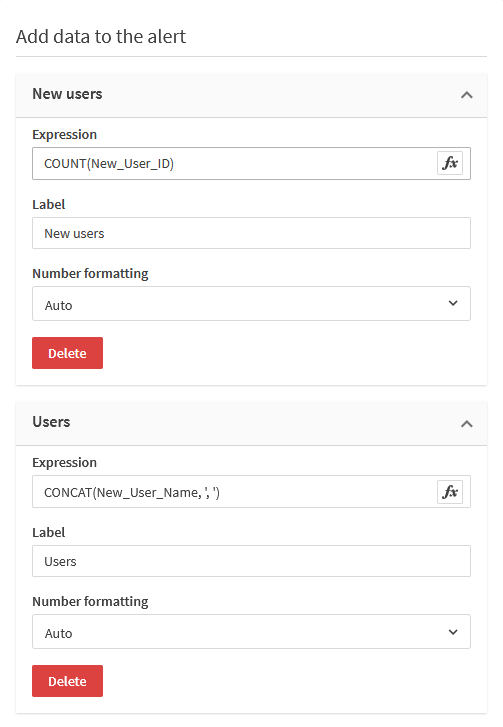
Right click on the KPI object and choose Create alert. Provide title and description and add two measures:
New users: COUNT(New_User_ID)
Users:     CONCAT(New_User_Name,', ')
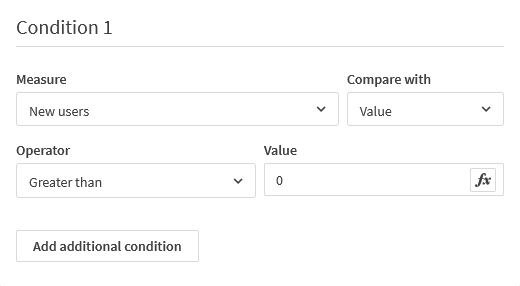
Next, set up your conditions, e.g. getting an alert when the number of new users is greater than 0.
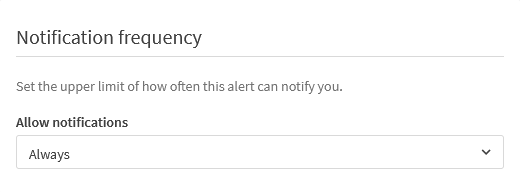
In the final step, set the desired distribution options and save the alert. If you select Always, next time when the app is reloaded and there are new users in the tenant, you will be notified immediately.
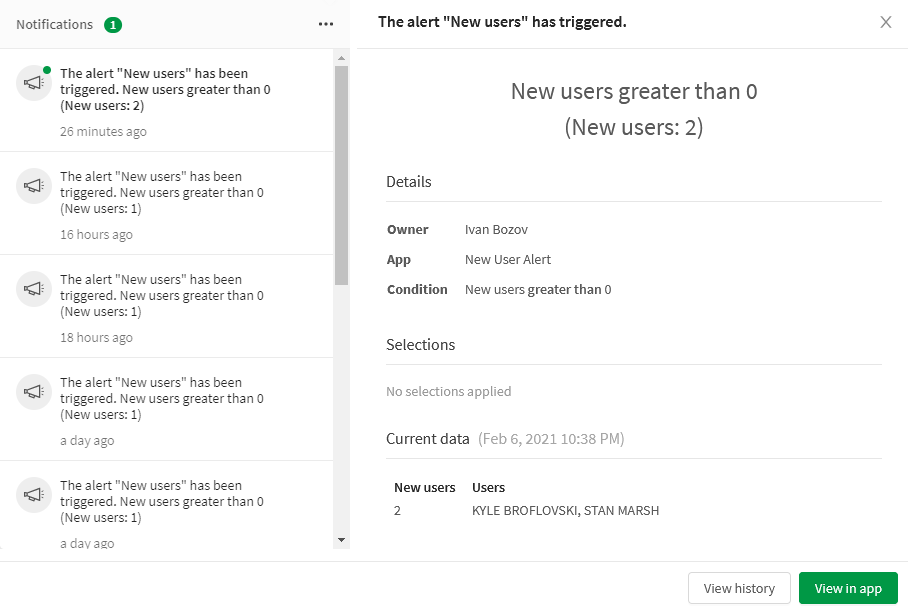
The final result looks like this:
The only thing left is to schedule the app reloads. That’s all, user management should be a bit easier now.